
Hugo generador de páginas web estáticas: Empezando con Hugo.
Table of contents
Porqué Hugo
Escogí hugo después de comparar los top static site gen y leer un par de posts de jekyll vs hugo, cada uno tendrá sus preferencias. Este és el primer SSG que uso ya que por alguno tenia que empezar, la documentación de Hugo es bastante amplia y fácil de entender.
Instalación de Hugo
Instalar Hugo dependerá del sistema operativo que tengamos. En Devian es tan fácil como usar apt.
root@kali:~/data# apt-get install hugo
Después de instalar, crearemos un nuevo directorio para trabajar ordenadamente.
root@kali:~/data# mkdir hugo
root@kali:~/data# cd hugo
Creación de la estructura del sitio
Con Hugo podemos crear una estructura básica para el nuevo sitio web.
root@kali:~/data/hugo# hugo new site viel_losero
Congratulations! Your new Hugo site is created in /root/data/hugo/viel_losero.

Just a few more steps and you're ready to go:

1. Download a theme into the same-named folder.
   Choose a theme from https://themes.gohugo.io/ or
   create your own with the "hugo new theme <THEMENAME>" command.
2. Perhaps you want to add some content. You can add single files
   with "hugo new <SECTIONNAME>/<FILENAME>.<FORMAT>".
3. Start the built-in live server via "hugo server".

Visit https://gohugo.io/ for quickstart guide and full documentation.
Veamos que estructura básica nos ha creado.
root@kali:~/data/hugo# tree
.
└── viel_losero
    ├── archetypes
    │   └── default.md
    ├── config.toml
    ├── content
    ├── data
    ├── layouts
    ├── static
    └── themes

7 directories, 2 files
Creación del repositorio git
Una vez creada la estructura básica entraremos en el nuevo directorio del sitio web y iniciaremos un repositorio git.
root@kali:~/data/hugo# cd viel_losero/
root@kali:~/data/hugo/viel_losero#
root@kali:~/data/hugo/viel_losero# git init
Inicializado repositorio Git vacío en /root/data/hugo/viel_losero/.git/
Un simple listado nos dejara ver el nuevo repositorio .git,
root@kali:~/data/hugo/viel_losero# ls -la
total 4
drwxr-xr-x 9 root root 125 oct  3 15:08 .
drwxr-xr-x 3 root root  41 oct  3 15:08 ..
drwxr-xr-x 2 root root  24 oct  3 15:08 archetypes
-rw-r--r-- 1 root root  82 oct  3 15:08 config.toml
drwxr-xr-x 2 root root   6 oct  3 15:08 content
drwxr-xr-x 2 root root   6 oct  3 15:08 data
drwxr-xr-x 7 root root 119 oct  3 15:08 .git
drwxr-xr-x 2 root root   6 oct  3 15:08 layouts
drwxr-xr-x 2 root root   6 oct  3 15:08 static
drwxr-xr-x 2 root root   6 oct  3 15:08 themes
Instalación de un tema como submódulo
El servidor de pruevas de Hugo no se inicia sin un tema, nos dará un error. Para instalar un tema de hugo como submódulo git podemos descargarlo desde https://themes.gohugo.io/. Instalar el tema como un submodulo git nos permitirá mantenerlo actualizado.
root@kali:~/data/hugo/viel_losero# git submodule add https://github.com/panr/hugo-theme-terminal.git themes/terminal
Clonando en '/root/data/hugo/viel_losero/themes/terminal'...
remote: Enumerating objects: 779, done.
remote: Total 779 (delta 0), reused 0 (delta 0), pack-reused 779
Recibiendo objetos: 100% (779/779), 1.91 MiB | 869.00 KiB/s, listo.
Resolviendo deltas: 100% (407/407), listo.
Elegido el tema, yo he escogido terminal para esta prueba, copiaremos la configuración inicial como sugiere el creador,
root@kali:~/data/hugo/viel_losero# cat <<EOF>config.toml
baseurl = "/"
languageCode = "en-us"
theme = "terminal"
paginate = 5

[params]
  # dir name of your blog content (default is `content/posts`)
  contentTypeName = "posts"
  # ["orange", "blue", "red", "green", "pink"]
  themeColor = "orange"
  # if you set this to 0, only submenu trigger will be visible
  showMenuItems = 2
  # show selector to switch language
  showLanguageSelector = false
  # set theme to full screen width
  fullWidthTheme = false
  # center theme with default width
  centerTheme = false
  # set a custom favicon (default is a `themeColor` square)
  # favicon = "favicon.ico"

[languages]
  [languages.en]
    languageName = "English"
    title = "Terminal"
    subtitle = "Vel006 public things"
    keywords = ""
    copyright = ""
    menuMore = "Show more"
    readMore = "Read more"
    readOtherPosts = "Read other posts"

    [languages.en.params.logo]
      logoText = "Terminal"
      logoHomeLink = "/"

    [languages.en.menu]
      [[languages.en.menu.main]]
        identifier = "about"
        name = "About"
        url = "/about"
      [[languages.en.menu.main]]
        identifier = "showcase"
        name = "Showcase"
        url = "/showcase"
EOF
Creación de un post de prueba
Instalado el tema, crearemos un nuevo post de prueba con el lenguaje de marcas Markdown, esta es una de las características de Hugo publicar archivos con extensión md.
Para el nuevo post de prueba usaré este propio archivo .md de notas sobre la instalación y testeo de Hugo.
root@kali:~/data/hugo/viel_losero# hugo new posts/hugo-start-how-to.md
root@kali:~/data/hugo/viel_losero# vi content/posts/hugo-start-how-to.md
Una vez todo listo, iniciamos el servidor de pruebas local que viene con Hugo para ver el resultado.
root@kali:~/data/hugo/viel_losero# hugo server -D
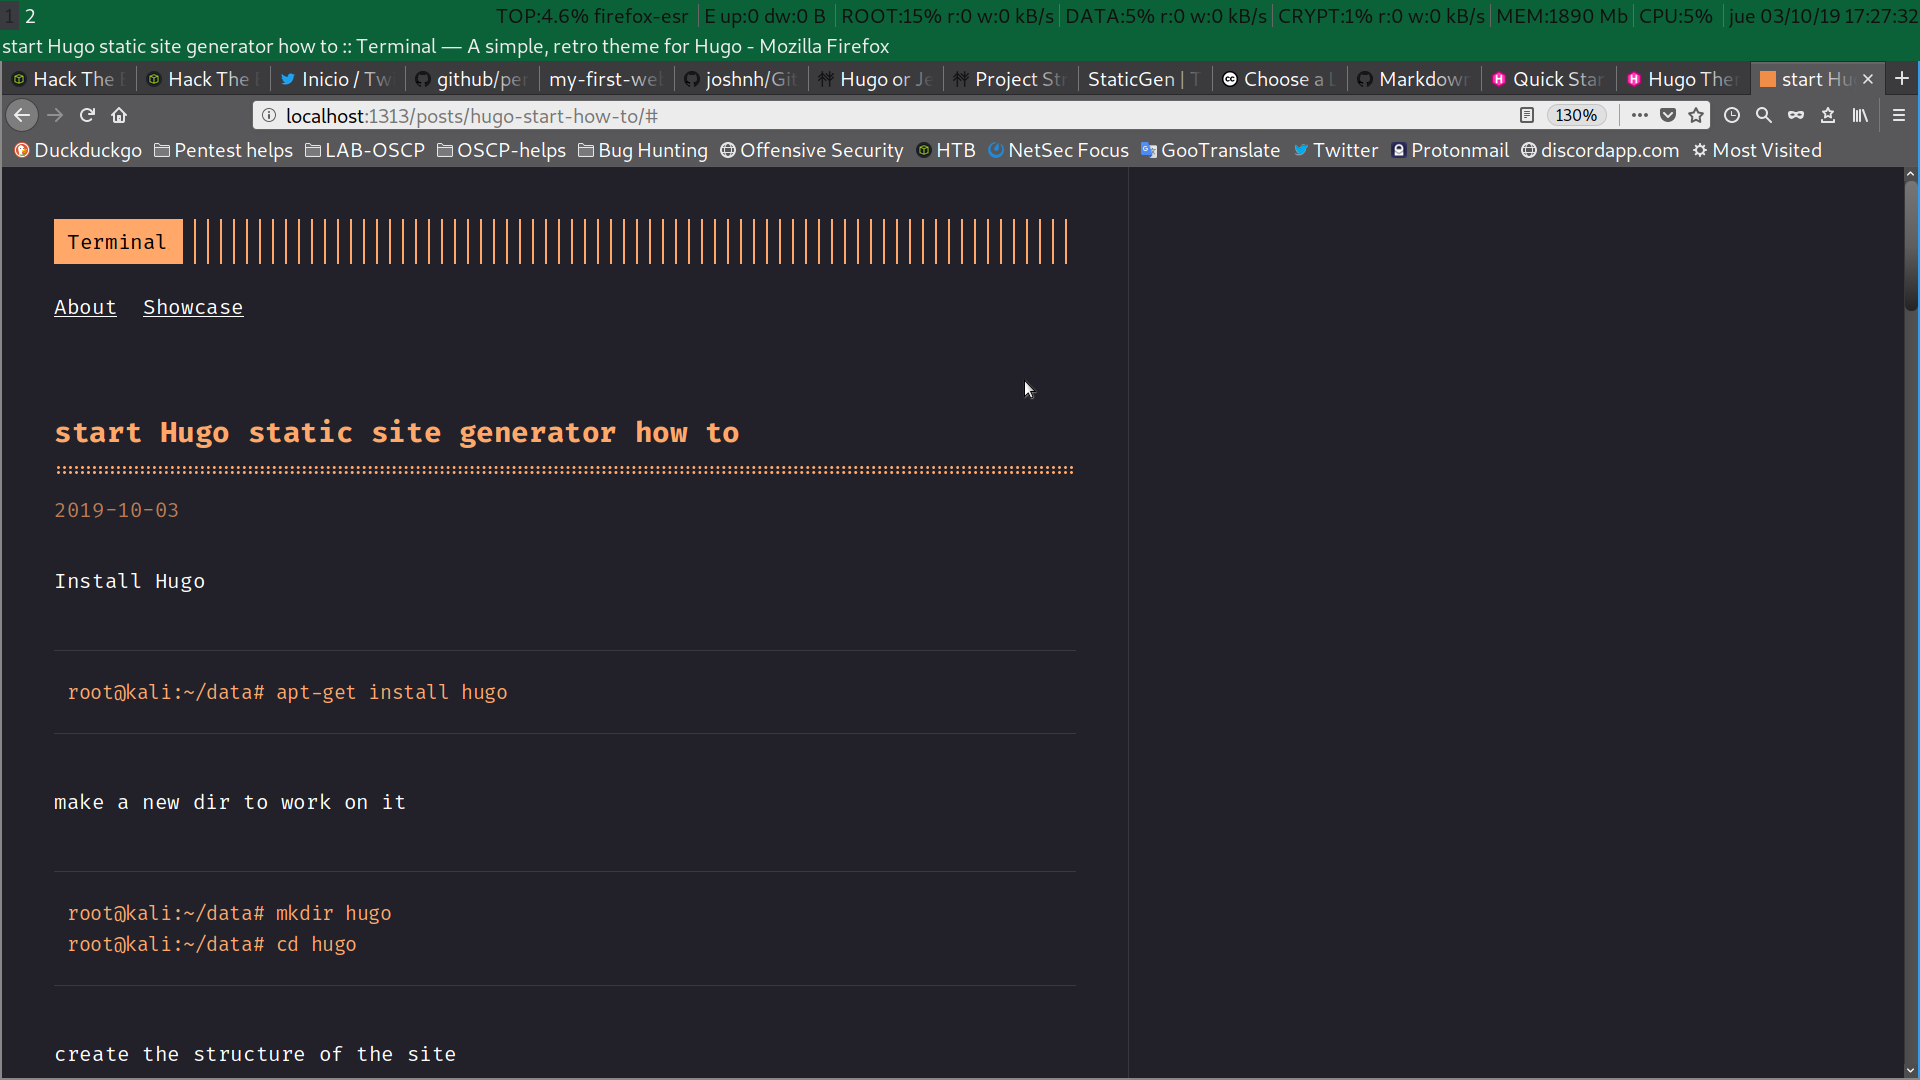
Finalmente haremos una captura de pantalla del resultado y la añadiremos al post.
root@kali:~/data/hugo/viel_losero# mkdir static/images
root@kali:~/data/hugo/viel_losero# cp /root/Imágenes/Captura\ de\ pantalla\ -2019-10-03\ 17-27-33.png static/images/hugo-dev.png
Resultado
Aquí tenemos la captura de pantalla con el resultado de mi primera prueba con Hugo.
back
Referencias:
Licencia: CC-BY-SA